Butterfly美化方案【1】
|字数总计:2.4k|阅读时长:10分钟|阅读量:
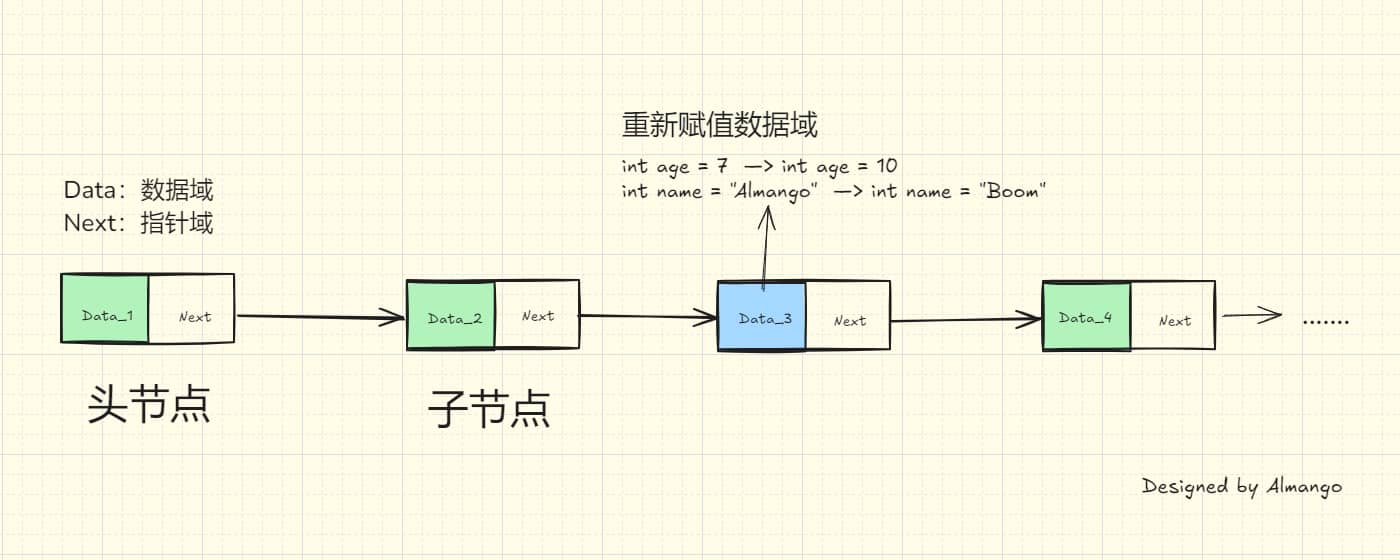
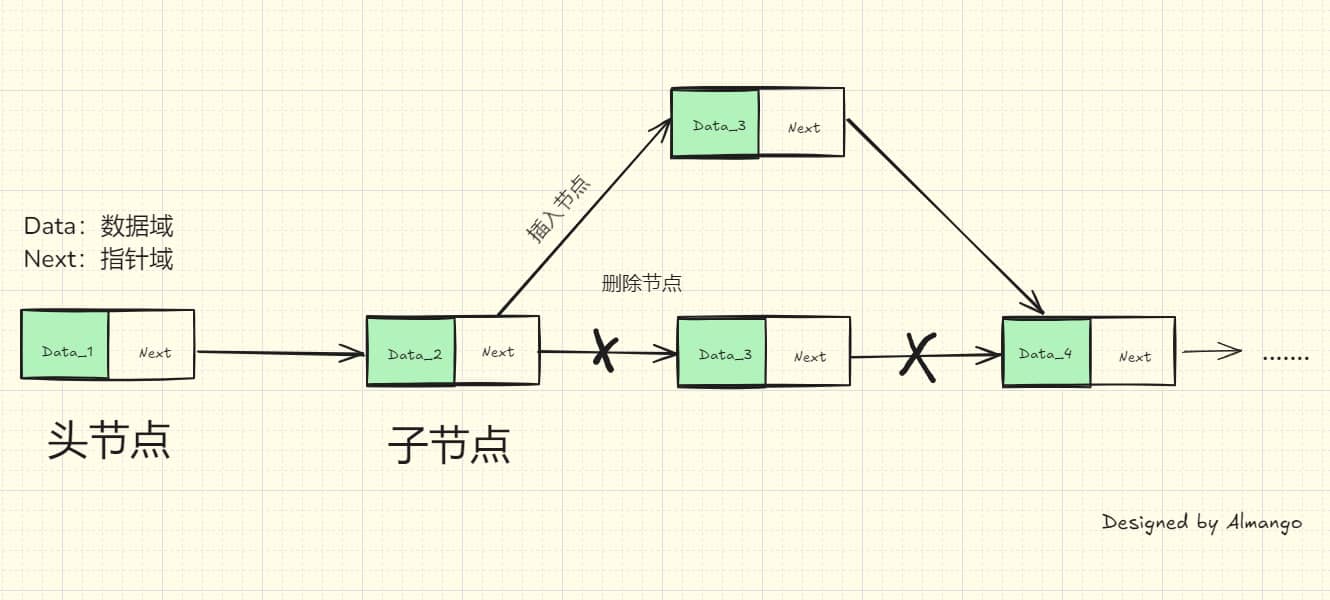
页面
标签页面
1 . 创建标签页面
hexo new page tags
2 . 将index.md的内容修改下面内容:
1
2
3
4
5
6
| ---
title: 标签
date: 2024-07-18 10:14:31
type: "tags"
top_img: false
---
|
分类页面
1 . 创建分类页面
hexo new page categories
2 . 将index.md的内容修改下面内容:
1
2
3
4
5
6
| ---
title: 分类
date: 2024-07-18 10:14:10
type: "categories"
top_img: false
---
|
友链页面
1 . 创建友链页面
hexo new page link
2 . 将index.md的内容修改下面内容:
1
2
3
4
5
| ---
date: 2024-07-17 14:59:33
type: 'link'
top_img: false
---
|
温馨提示:一般而言,归档(archives)页面是不用创建的,它会自动生成。
另外: top_img:是用于开关页面顶部的封面,可按需求使用。
页面FPS监测
任意页面显示当前页面的FPS帧数,对于不同的fps大小会有不同的显示效果。
效果:

本教程参考了青稚的:Butterfly主题美化
1 . 在source/css/目录新建一个样式文件fps.css输入以下代码:
1
2
3
4
5
6
7
8
9
10
11
12
13
14
15
16
17
18
19
20
21
|
#fps {
position: fixed;
right: 10px;
bottom: 10px;
z-index: 1919810
}
[data-theme=light] #fps {
background-color: rgba(255,255,255,.85);
backdrop-filter: blur(5px) saturate(150%);
padding: 0 6px;
border-radius: 20px
}
[data-theme=dark] #fps {
background-color: rgba(0,0,0,.72);
backdrop-filter: blur(5px) saturate(150%);
padding: 0 6px;
border-radius: 20px
}
|
2 . 在source/js/目录新建一个样式文件fps.js输入以下代码:
1
2
3
4
5
6
7
8
9
10
11
12
13
14
15
16
17
18
19
20
21
22
23
24
25
26
27
28
29
30
31
32
33
34
35
36
37
38
39
40
41
42
43
44
45
46
47
48
49
50
51
52
53
54
55
56
57
58
59
60
61
| document.addEventListener('pjax:complete', fps);
document.addEventListener('DOMContentLoaded', fps);
function fps(){
var rAF = function () {
return (
window.requestAnimationFrame ||
window.webkitRequestAnimationFrame ||
function (callback) {
window.setTimeout(callback, 1000 / 60);
}
);
}();
var frame = 0;
var allFrameCount = 0;
var lastTime = Date.now();
var lastFameTime = Date.now();
var loop = function () {
var now = Date.now();
var fs = (now - lastFameTime);
var fps = Math.round(1000 / fs);
lastFameTime = now;
allFrameCount++;
frame++;
if (now > 1000 + lastTime) {
var fps = Math.round((frame * 1000) / (now - lastTime));
if(fps<=5){
var kd=`<span style="color:#ff1b1b">卡成ppt🤢</span>`
}
else if(fps<=15){
var kd=`<span style="color:red">电竞级帧率😖</span>`
}
else if(fps<=25){
var kd=`<span style="color:yellow">有点难受😨</span>`
}
else if(fps<35){
var kd=`<span style="color:orange">不太流畅🙄</span>`
}
else if(fps<=45){
var kd=`<span style="color:#59d8ef">还不错哦😁</span>`
}
else{
var kd=`<span style="color:#0ace00">十分流畅😍</span>`
}
document.getElementById("fps").innerHTML=`FPS:${fps} ${kd}`;
frame = 0;
lastTime = now;
};
rAF(loop);
}
loop();
}
|
3 . 最后在主题配置文件.config.yml中将其引入即可。
主页
打开文件:source\css\_page\homepage.styl
文章列表样式
1 .你可以在这里修改主页文章列表区块的样式
2 . 修改文章列表的边框样式,例如:
1
2
3
4
5
6
7
8
| & > .recent-post-item
@extend .cardHover
display: flex
flex-direction: row
align-items: center
overflow: hidden
height: 15em ## 修改高度
border-radius:12px ## 修改圆角曲度
|
3 . 修改文章列表中的内容字体大小,例如:
1
2
3
4
| & > .content
@extend .limit-more-line
-webkit-line-clamp: 2
font-size: 15px ## 自定义内容字体大小
|
导航栏
网站名称及字体大小
新建文件:source/css/custom.css(可在该文件中自定义主页中任何元素)
1
2
| .menus_item { font-size: 20px;} // 自定义导航栏字体大小
.site-name { font-size: 23px;} // 自定义左上角名称大小
|
导航栏圆角框及缩短居中效果
新建文件:source/css/custom.css(可在该文件中自定义主页中任何元素)
1
2
3
4
5
6
7
| #nav
{
width: 95%; // 宽度缩短5%
left: 2.5%; // 导航栏居中
border-radius: 20px; //边框圆角化
}
|
打开文件:ource\css\_layout\head.styl
1 . 添加下列带➕号的代码,带➖号的代码可以直接删掉。
1
2
3
4
5
6
7
8
9
10
11
12
13
14
15
16
17
18
|
#nav
  position: absolute
  top: 0
  z-index: 90
  display: flex
  align-items: center
  padding: 0 36px
-  width: 100%
  height: 60px
  font-size: 1.3em
  opacity: 0
  transition: all .5s

+  width: 70%      // 宽度缩短30%
+  left: 15%       // 导航栏居中
+  border-radius: 20px   // 边框圆角化
|
解释一下:custom.css文件中的代码主要是将主页的导航栏圆角化并缩短居中,仅在主页有效。而head.styl中的代码则对文章中的导航栏产生效果。两种效果可以同时添加。
侧边栏
社交图标
最近文章 & 评论头像圆角
打开文件:themes\butterfly\source\css\_layout\aside.styl
1 . 侧边栏最近文章封面圆角
1
2
3
4
| .card-recent-post
img
+ border-radius: 20%
overflow: hidden;
|
2 . 侧边栏评论者头像圆角
1
2
3
4
| :first-child
@extend .imgHover
+ border-radius: 20%
|
打开主题文件:themes\butterfly\_config.yml
1 . 在social下添加如图所示代码即可
2 . 若想自定义图标,可在Fontawesome中选择并添加到代码中。
1
2
3
4
5
| social:
+ fa-brands fa-qq: mailto:xxxxxx@gmail.com || QQ || '#4a7dbe'
+ fab fa-github: https:
+ fa-brands fa-bilibili: https:
+ fa-regular fa-envelope: mailto:xxxxxx@gmail.com || Email || '#FFD43B'
|
目录悬停效果
打开文件:themes\butterfly\source\css\_layout\aside.styl
1 . 我们直接把&.active中的代码替换成下面代码即可。
1
2
3
4
5
| + background-color: white
+ color: #626262
+ border-radius: 8px
+ box-shadow:1px 2px 3px #CFCFCF,2px 2px 3px #E4E4E4,3px 3px 3px
+ padding: 5px
|
归档&分类凸起样式
打开文件:themes\butterfly\source\css\_layout\aside.styl
1 . 我们只需要添加这两行代码即可(把+号去掉即可使用)
1
2
3
4
5
6
7
8
9
10
11
12
13
14
15
16
| .card-archives ul.card-archive-list > .card-archive-list-item,
.card-categories ul.card-category-list > .card-category-list-item
a
display: flex
flex-direction: row
padding: 3px 10px
color: var(--font-color)
transition: all .4s
+ border-radius: 5px
&:hover
padding: 3px 17px
background-color: white
border-radius: 6px
+ box-shadow:1px 2px 3px #CFCFCF,2px 2px 3px #E4E4E4,3px 3px 3px #D6D6D6
|
标签悬停样式
打开文件:themes\butterfly\source\css\_layout\aside.styl
1 . 通过鼠标悬停触发该效果。
2 . 可以按自己的需求添加样式代码,如下代码所示。
1
2
3
4
5
6
7
8
| .card-tag-cloud
a
display: inline-block
padding: 0 4px
&:hover
color: hotpink !important
+ padding: 8px
|
文章
插图圆角
打开文件:source\css\_highlight\highlight.styl
1 . 在img插入border-radius圆角代码即可,如下代码所示。
1
2
3
4
5
6
| img
display: block
margin: 0 auto 20px
max-width: 100%
transition: filter 375ms ease-in .2s
+ border-radius: 12px
|
代码块圆角
打开文件:source\css\_highlight\highlight.styl
1 . 只需要在$code-block中添加个圆角样式代码即可。
1
2
3
4
5
6
7
8
| $code-block
overflow: auto
margin: 0 0 20px
padding: 0
background: var(--hl-bg)
color: var(--hl-color)
line-height: $line-height-code-block
+ border-radius: 12px
|
代码块边框阴影
打开文件:source\css\_highlight\highlight.styl
1 . 在 figure.highlight中添加边框阴影代码即可。
1
2
3
4
| figure.highlight
@extend $code-block
position: relative
+ box-shadow:1px 2px 3px #292929,2px 2px 3px #E4E4E4,3px 3px 3px #D6D6D6
|
上一篇下一篇图形圆角
打开文件:source\css\_layout\pagination.styl
1 . 只需要在&.pagination-post中添加个圆角样式代码即可。
1
2
3
4
5
6
7
| &.pagination-post
overflow: hidden
margin-top: 40px
width: 100%
background: $dark-black
+ border-radius: 12px
|
标题小图标
主题配置文件:themes\butterfly\_config.yml
可在主题配置文件中将图标开启使用。
1
2
3
4
5
6
| # Beautify (美化頁面顯示)
beautify:
enable: true
field: post # site/post
title-prefix-icon: '\f863'
title-prefix-icon-color: '#eca100'
|
1 . 我们也可以适当调整一下图标大小和位置
2 . 可以在custom.css自定义一以下代码,再通过head引入即可
1
2
3
4
5
6
7
8
9
10
11
12
13
14
15
16
17
18
19
20
21
22
23
24
25
26
27
28
29
30
31
32
33
34
35
36
37
|
#content-inner.layout h1::before {
color: #ef50a8 ;
margin-left: -1.55rem;
font-size: 1.3rem;
margin-top: -0.33rem;
}
#content-inner.layout h2::before {
color: #fb7061 ;
margin-left: -1.35rem;
font-size: 1.1rem;
margin-top: -0.21rem;
}
#content-inner.layout h3::before {
color: #ffbf00 ;
margin-left: -1.22rem;
font-size: 0.95rem;
margin-top: -0.15rem;
}
#content-inner.layout h4::before {
color: #a9e000 ;
margin-left: -1.05rem;
font-size: 0.8rem;
margin-top: 0rem;
}
#content-inner.layout h5::before {
color: #57c850 ;
margin-left: -0.9rem;
font-size: 0.7rem;
margin-top: 0.0rem;
}
#content-inner.layout h6::before {
color: #5ec1e0 ;
margin-left: -0.9rem;
font-size: 0.66rem;
margin-top: 0.0rem;
}
|
3 . 不仅如此,如果不喜欢图标,可以换一个图标(Fontawesome)
4 . 更多样式可参考:我的Blog美化日记——Hexo+Butterfly
代码高度限制
主题配置文件:themes\butterfly\_config.yml
1
| highlight_height_limit: false # unit: px
|
字体
全局字体
1 . 我们可以在主题配置文件中的inject:处引用Google Font的字体。
2 . 我们打开Google Fonts,找到自己喜欢的字体,然后点击”Get Fonts”,再点击”Get embed code”,将图中所示的css链接复制到主题配置文件中的Inject:头部即可。

1
2
3
4
5
6
| inject:
head:
+ - <link rel="stylesheet" href="css/custom.css">
+ - <link rel="preconnect" href="https://fonts.googleapis.com">
+ - <link rel="preconnect" href="https://fonts.gstatic.com" crossorigin>
+ - <link href="https://fonts.googleapis.com/css2?family=Comic+Neue:ital,wght@0,300;0,400;0,700;1,300;1,400;1,700&family=Varela+Round&display=swap" rel="stylesheet">
|
3 . 最后font:中启用该字体就可以了
1
2
3
4
5
| font:
global-font-size: 17px
code-font-size: 15px
font-family: Varela Round, sans-serif
code-font-family: JetBrains Mono Medium
|
站点名称字体和主页居中字体
1 . 打开主题配置文件,在blog_title_font:处有两个空:font_link和font-family。
2 . 我们可在Google Fonts中选择喜欢的字体。我们选中字体,将图中两处代码分别复制到font_link和font-family中即可。

1
2
3
| blog_title_font:
font_link: https://fonts.font.im/css?family=Didact+Gothic|Fredoka+One
font-family: Didact Gothic, sans-serif
|
CDN加速
jsDelivr提升访问速度
参考:hexo butterfly主题自定义cdn代替jsDelivr提升访问速度
1 . 打开主题文件:themes/butterfly/_config.yml
2 . 找到option,将要加速的区域添加jsDelivr加速链接即可。